RAID howto
In Linux you can either just use a hardware RAID, which makes all your disks look like a single one (or two) to you OS, or do a software RAID setup when you load the OS, which can look daunting if you’re new to it.
To do this you have to format each drive as “physical volume for RAID”, and then you create an MD device that will be the partition that goes on top of the RAID volumes you created. If you use RAID 1, that means you have a hard drive mirror, and so two hard drives RAID 1 would be the same capacity as one of the drives, but if it fails, you still have the other one.
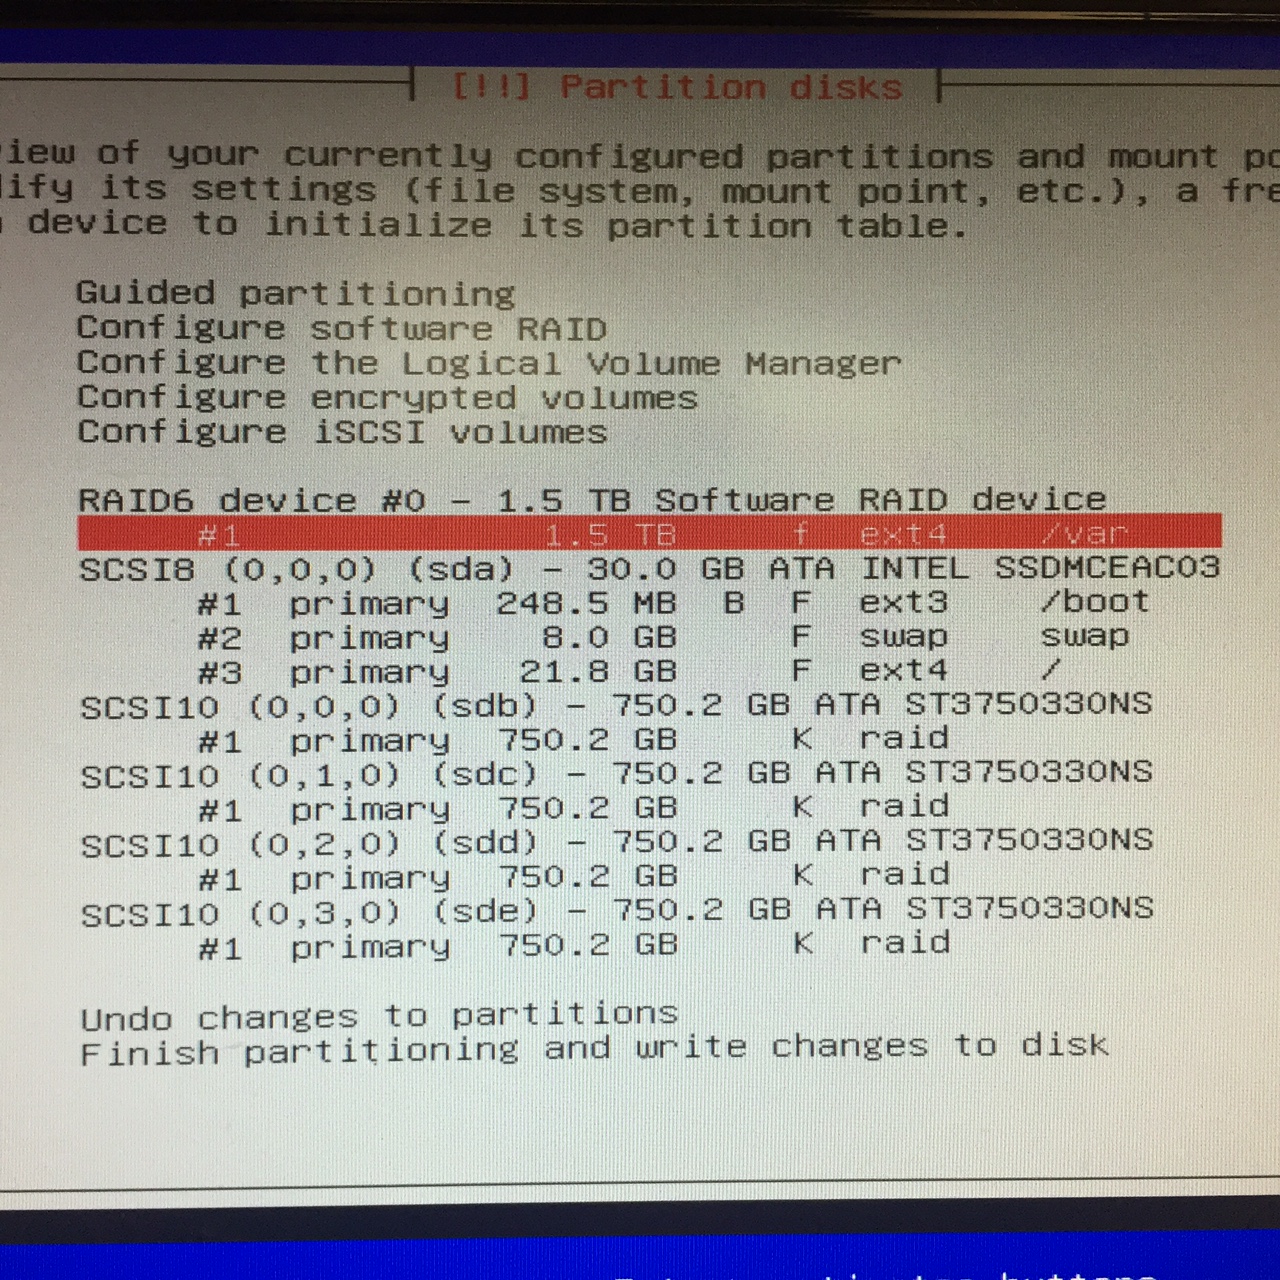
RAID 5 and 6 offer more redundancy, but use more drives, like at least 3. RAID 6 means 2 drives can fail and still have your data, so it’s a little more robust than RAID 5, but takes more drives. On the other hand, big drives are a pain to try to recover, so it might be worth it. Here’s an example of what it looks like to set up RAID 6 in Debian, and then I put my /var directory, since I plan on that holding lots of stuff, and I boot the OS off a 30G SSD, since that’s fast:
Once you create your RAID volumes and put stuff on them, you use mdadm tool to manage them, you start by getting the status like:
cat /proc/mdstat personalities : [raid6] [raid5] [raid4] md0 : active raid6 sdb1[1] sdc1[2] sdd1[3] 1464883200 blocks super 1.2 level 6, 512k chunk, algorithm 2 [4/3] [_UUU] bitmap: 3/6 pages [12KB], 65536KB chunk unused devices: <none> |
This says I have a RAID 6 set up, but I know I *should* have really 4 drives in my RAID volume, but this only shows 3, so I check it out with:
mdadm -D /dev/md0 /dev/md0: Version : 1.2 Creation Time : Wed Dec 2 10:43:46 2015 Raid Level : raid6 Array Size : 1464883200 (1397.02 GiB 1500.04 GB) Used Dev Size : 732441600 (698.51 GiB 750.02 GB) Raid Devices : 4 Total Devices : 3 Persistence : Superblock is persistent Intent Bitmap : Internal Update Time : Wed Jan 20 10:45:06 2016 State : clean, degraded Active Devices : 3 Working Devices : 3 Failed Devices : 0 Spare Devices : 0 Layout : left-symmetric Chunk Size : 512K Name : www:0 (local to host www) UUID : 574377b0:7ae2f061:ab417c11:357c8c53 Events : 23258 Number Major Minor RaidDevice State 0 0 0 0 removed 1 8 17 1 active sync /dev/sdb1 2 8 33 2 active sync /dev/sdc1 3 8 49 3 active sync /dev/sdd1 |
You can tell by the list at the end that /dev/sda1 isn’t really hooked up (because it failed, then I replaced it), so now I have to re-add my /dev/sda1. Make TRIPLE SURE you are re-adding the right drive, or bad nasty things will happen :/ Once you do that, try to add it like:
mdadm --re-add /dev/md0 /dev/sda1 mdadm: re-added /dev/sda1 |
Now you notice is shows up with the mdadm command like:
mdadm -D /dev/md0 /dev/md0: Version : 1.2 Creation Time : Wed Dec 2 10:43:46 2015 Raid Level : raid6 Array Size : 1464883200 (1397.02 GiB 1500.04 GB) Used Dev Size : 732441600 (698.51 GiB 750.02 GB) Raid Devices : 4 Total Devices : 4 Persistence : Superblock is persistent Intent Bitmap : Internal Update Time : Wed Jan 20 10:49:38 2016 State : clean, degraded, recovering Active Devices : 3 Working Devices : 4 Failed Devices : 0 Spare Devices : 1 Layout : left-symmetric Chunk Size : 512K Rebuild Status : 0% complete Name : www:0 (local to host www) UUID : 574377b0:7ae2f061:ab417c11:357c8c53 Events : 23261 Number Major Minor RaidDevice State 0 8 1 0 spare rebuilding /dev/sda1 1 8 17 1 active sync /dev/sdb1 2 8 33 2 active sync /dev/sdc1 3 8 49 3 active sync /dev/sdd1 |
See, now it says /dev/sda1 is rebuilding, you can check the process like:
cat /proc/mdstat Personalities : [raid6] [raid5] [raid4] md0 : active raid6 sda1[0] sdb1[1] sdc1[2] sdd1[3] 1464883200 blocks super 1.2 level 6, 512k chunk, algorithm 2 [4/3] [_UUU] [>....................] recovery = 0.2% (1978368/732441600) finish=178.4min speed=68219K/sec bitmap: 3/6 pages [12KB], 65536KB chunk unused devices: <none> |
That means it is 0.2% done rebuilding. This process takes forever (it seems) if you have larger drives, or like hours at least. Keep checking back, and you should eventually see:
cat /proc/mdstat Personalities : [raid6] [raid5] [raid4] md0 : active raid6 sda1[0] sdb1[1] sdc1[2] sdd1[3] 1464883200 blocks super 1.2 level 6, 512k chunk, algorithm 2 [4/4] [UUUU] bitmap: 0/6 pages [0KB], 65536KB chunk |
Notice how it now shows my sda1 drive as part of the RAID 6 🙂
Also, mdadm will email you (if you have a default Postfix installed and set up your email address in /etc/aliases) if one of the drives does something weird, which is a super nice feature 🙂 Here’s how you set that up:
apt-get install postfix Select 'internet site' vi /etc/aliases root: whateveruser whateveruser: enter@youremail.com newaliases vi /etc/mdadm/mdadm.conf MAILADDR root <-- make sure this it uncommented |
to test a failed drive do:
mdadm --monitor --scan --test -1 |
if it worked, you should get an email summary from ‘mdadm monitoring’ of /proc/mdstat like:
This is an automatically generated mail message from mdadm running on whateverhostname A TestMessage event had been detected on md device /dev/md/1. Faithfully yours, etc. P.S. The /proc/mdstat file currently contains the following: Personalities : [raid6] [raid5] [raid4] md0 : active raid6 sda1[0] sdb1[1] sdc1[2] sdd1[3] 1464883200 blocks super 1.2 level 6, 512k chunk, algorithm 2 [4/4] [UUUU] bitmap: 0/6 pages [0KB], 65536KB chunk |
If you want to manually remove a drive for some reason without breaking stuff, you can do the following, note: MAKE TRIPLE SURE YOU”RE REMOVING THE RIGHT DRIVE:
sudo mdadm --remove /dev/md0 /dev/sdb1 |
Configuring a RAID6 from scratch on Debian Jessie
This is not for the beginner. You have a very high chance of not getting it right and blowing up your ENTIRE data structure.
If you’re using large drives (over 2TB), you’ll have to use a different tool to format them, fdisk doesn’t work. Let’s start by seeing what is on your drives. We’ll need at least 3 drives for a RAID 6, so in my case I have my Operating System installed on a SSD called /dev/sda, so I’m starting my RAID volumes on /dev/sdb:
apt-get install parted gdisk mdadm parted /dev/sdb (parted) p Model: ATA ST4000DM000-1F21 (scsi) Disk /dev/sdb: 4.00TB Sector size (logical/physical): 512B/4096B Partition Table: gpt Disk Flags: Number Start End Size File system Name Flags (parted) |
This means you don’t have any partition table on there, or any partitions set up. So first you have to build a GPT partition table, then build a partition to fit on it like:
mklabel gpt Warning: The existing disk label on /dev/sdb will be destroyed and all data on this disk will be lost. Do you want to continue? Yes/No? yes (parted) (parted) unit TB |
Okay, if there are no errors, you now have a usable disk, so now we’re going to create a single large RAID partition on the drive you just formatted like:
(parted) mkpart primary 0.00TB 4.00TB (parted) p Model: ATA ST4000DM000-1F21 (scsi) Disk /dev/sdb: 4.00TB Sector size (logical/physical): 512B/4096B Partition Table: gpt Disk Flags: Number Start End Size File system Name Flags 1 0.00GB 4001GB 4001GB primary |
Now you have to create a RAID partition file system on it like:
(parted)set 1 raid on (parted) p Model: ATA ST4000DM000-1F21 (scsi) Disk /dev/sdb: 4001GB Sector size (logical/physical): 512B/4096B Partition Table: gpt Disk Flags: Number Start End Size File system Name Flags 1 0.00GB 4001GB 4001GB primary raid (parted) quit Information: You may need to update /etc/fstab. |
Now use fdisk to see if the OS sees it:
fdisk -l Disk /dev/sdb: 3.7 TiB, 4000787030016 bytes, 7814037168 sectors Units: sectors of 1 * 512 = 512 bytes Sector size (logical/physical): 512 bytes / 4096 bytes I/O size (minimum/optimal): 4096 bytes / 4096 bytes Disklabel type: gpt Disk identifier: 29D2E5F9-7AFD-4DEA-8D15-9F3E3C8ED7C1 Device Start End Sectors Size Type /dev/sdb1 2048 7814035455 7814033408 3.7T Linux RAID |
Now you have to do the same formatting to the rest of your drives, in my case I have 5, so I’d do /dev/ sdc, sdd, sde, and sdf. Once you’re done with all that, you need mdadm, the RAID management tool, to build your RAID like:
mdadm --create --verbose /dev/md0 --level=6 --raid-devices=6 /dev/sda1 /dev/sdb1 /dev/sdc1 /dev/sdd1 /dev/sde1 /dev/sdf1 mdadm: layout defaults to left-symmetric mdadm: layout defaults to left-symmetric mdadm: chunk size defaults to 512K mdadm: /dev/sdb1 appears to be part of a raid array: level=raid6 devices=4 ctime=Tue Jul 19 10:34:55 2016 mdadm: size set to 3906885632K mdadm: automatically enabling write-intent bitmap on large array Continue creating array? yes mdadm: Defaulting to version 1.2 metadata mdadm: array /dev/md0 started. >: cat /proc/mdstat Personalities : [raid6] [raid5] [raid4] md0 : active raid6 sdf1[5] sde1[4] sdd1[3] sdc1[2] sdb1[1] sda1[0] 15627542528 blocks super 1.2 level 6, 512k chunk, algorithm 2 [6/6] [UUUUUU] [>....................] resync = 0.0% (1494792/3906885632) finish=827.3min speed=78673K/sec bitmap: 30/30 pages [120KB], 65536KB chunk unused devices: <none> |
This will take a very long time, like hours. You can format it in the meantime and use it. Also, the mdadm command will save it so it’s available the next time you reboot the machine. If you ever have to rebuild this array on a new machine, you can copy the /etc/mdadm/mdadm.conf file, and just run ‘mdadm –assemble –scan’.
To create the LVM on top of what you just build, use the command:
pvcreate -ff /dev/md0 Really INITIALIZE physical volume "/dev/md0" of volume group "backupvol1" [y/n]? y WARNING: Forcing physical volume creation on /dev/md0 of volume group "backupvol1" Physical volume "/dev/md0" successfully created |
Now you have to create your volume group like:
vgcreate raidvol1 /dev/md0 Volume group "raidvol1" successfully created |
Now you have to create the logical volume like:
lvcreate -l 100%FREE -n raidvol1lv raidvol1 Logical volume "raidvol1lv" created |
Now you format it like a normal filesystem:
mkfs -t ext4 /dev/raidvol1/raidvol1lv mke2fs 1.42.12 (29-Aug-2014) Creating filesystem with 3906884608 4k blocks and 488361984 inodes Filesystem UUID: d04aa16b-5f35-43a9-a0cd-35aa6fbfdc4f Superblock backups stored on blocks: 32768, 98304, 163840, 229376, 294912, 819200, 884736, 1605632, 2654208, 4096000, 7962624, 11239424, 20480000, 23887872, 71663616, 78675968, 102400000, 214990848, 512000000, 550731776, 644972544, 1934917632, 2560000000, 3855122432 Allocating group tables: done Writing inode tables: done Creating journal (32768 blocks): done Writing superblocks and filesystem accounting information: |
Okay, now you want to mount it somewhere, so create a directory someplace and mount it:
mkdir /some/path/you/want mount /dev/raidvol1/raidvol1lv /whatever/path/you/created/ |
Now it should be ready to use 🙂 If you want it to be seen the next time you reboot, add an entry to your /etc/fstab. To do that you should use the UUID of the volume, not just the /dev/raidvol1/raidvol1lv or some such. You find out what the UUID is by doing:
blkid -c /dev/null | grep raidvol /dev/mapper/raidvol1-raidvol1lv: UUID="d04aa16b-5f35-43a9-a0cd-35aa6fbfdc4f" TYPE="ext4" |
Now put that in the end of your /etc/fstab like:
vi /etc/fstab (add following line to end of it, but change as needed) #big raid6 volume used for whatever UUID=d04aa16b-5f35-43a9-a0cd-35aa6fbfdc4f /raid6volume ext4 errors=remount-ro 0 1 |
Now if you reboot, you should see your raid volume, mounted wherever you wanted to mount it 🙂
RAID maintenance
Here are some commands to manage your RAID. First, here’s the status of your RAID you just created:
mdadm -D /dev/raidvol1/raidvol1lv /dev/raidvol1/raidvol1lv: Version : 1.2 Creation Time : Thu Aug 25 11:37:17 2016 Raid Level : raid6 Array Size : 15627538432 (14903.58 GiB 16002.60 GB) Used Dev Size : 3906885632 (3725.90 GiB 4000.65 GB) Raid Devices : 6 Total Devices : 6 Persistence : Superblock is persistent Intent Bitmap : Internal Update Time : Fri Aug 26 14:53:52 2016 State : active Active Devices : 6 Working Devices : 6 Failed Devices : 0 Spare Devices : 0 Layout : left-symmetric Chunk Size : 512K Name : debian:0 (local to host debian) UUID : 9b16b2c6:0d326920:377c3e6f:23b37baa Events : 17624 Number Major Minor RaidDevice State 0 8 1 0 active sync /dev/sda1 1 8 17 1 active sync /dev/sdb1 2 8 33 2 active sync /dev/sdc1 3 8 49 3 active sync /dev/sdd1 4 8 65 4 active sync /dev/sde1 5 8 81 5 active sync /dev/sdf1 |
If you want to check the status of one of the disks in the RAID, do:
mdadm -E /dev/sda1 /dev/sda1: Magic : a92b4efc Version : 1.2 Feature Map : 0x1 Array UUID : 9b16b2c6:0d326920:377c3e6f:23b37baa Name : debian:0 (local to host debian) Creation Time : Thu Aug 25 11:37:17 2016 Raid Level : raid6 Raid Devices : 6 Avail Dev Size : 7813771264 (3725.90 GiB 4000.65 GB) Array Size : 15627542528 (14903.59 GiB 16002.60 GB) Data Offset : 262144 sectors Super Offset : 8 sectors Unused Space : before=262056 sectors, after=0 sectors State : active Device UUID : f28484a6:ac669b6c:61059466:6f8b45f4 Internal Bitmap : 8 sectors from superblock Update Time : Fri Aug 26 14:58:07 2016 Bad Block Log : 512 entries available at offset 72 sectors Checksum : 468b744 - correct Events : 17676 Layout : left-symmetric Chunk Size : 512K Device Role : Active device 0 Array State : AAAAAA ('A' == active, '.' == missing, 'R' == replacing) |
If you want to do a file system check on the raid, called a scrub, do something like:
echo check > /sys/block/md0/md/sync_action watch -n .1 cat /proc/mdstat |
If a disk fails and you want to remove it do:
mdadm --remove /dev/md0 /dev/sda1 |
If you want to add a working one back in to begin the rebuild process, you have to format it first and make SURE the partitions match the other drives in the group. Once you do that, you can attempt to re-add it like:
mdadm --add /dev/md0 /dev/sda1 |
Sometimes Debian will decide it still needs to be marked as a spare and not used. If that’s the case, you’ll have to unmount and stop the RAID and try to re-assemble it like below, making SURE you use the –assume-clean switch or it will just rebuild the whole thing, which is very bad:
mdadm --stop /dev/md0 mdadm --create /dev/md0 --level=6 --raid-devices=4 --chunk=64 --name=RackStation:2 /dev/sda3 /dev/sdb3 /dev/sdc3 /dev/sdd3 --assume-clean |
Once you put it back in successfully, it will force mdadm to re-sync the RAID, which may take hours. You can monitor its progress by running:
watch -n .1 cat /proc/mdstat |
which will give you a progress bar like:
md1 : active raid1 sdb3[2] sda3[0] 1433512960 blocks super 1.2 [2/1] [U_] [===========>.........] recovery = 56.9% (817050432/1433512960) finish=197.6min speed=51970K/sec bitmap: 7/11 pages [28KB], 65536KB chunk md0 : active raid1 sdb2[2] sda2[0] 31234048 blocks super 1.2 [2/2] [UU] |
When it’s done, which could be a loooong time, you should see something like:
Every 0.1s: cat /proc/mdstat Thu Jan 25 14:35:40 2018 Personalities : [raid1] md1 : active raid1 sdb3[2] sda3[0] 1433512960 blocks super 1.2 [2/2] [UU] bitmap: 4/11 pages [16KB], 65536KB chunk md0 : active raid1 sdb2[2] sda2[0] 31234048 blocks super 1.2 [2/2] [UU] unused devices: <none> |
If you want to see what physical volumes you’ve created do:
pvdisplay --- Physical volume --- PV Name /dev/md0 VG Name raidvol1 PV Size 14.55 TiB / not usable 4.00 MiB Allocatable yes (but full) PE Size 4.00 MiB Total PE 3815317 Free PE 0 Allocated PE 3815317 PV UUID k8y1t4-dNGG-krdL-mXEp-20e0-GoHn-n0hRgx |
To show what volume groups you have do:
vgdisplay --- Volume group --- VG Name raidvol1 System ID Format lvm2 Metadata Areas 1 Metadata Sequence No 2 VG Access read/write VG Status resizable MAX LV 0 Cur LV 1 Open LV 0 Max PV 0 Cur PV 1 Act PV 1 VG Size 14.55 TiB PE Size 4.00 MiB Total PE 3815317 Alloc PE / Size 3815317 / 14.55 TiB Free PE / Size 0 / 0 VG UUID YJDj53-vowl-GwEh-yYyt-UYJU-G4jG-uKWWKN |
To show your logical volumes do:
lvdisplay --- Logical volume --- LV Path /dev/raidvol1/raidvol1lv LV Name raidvol1lv VG Name raidvol1 LV UUID NxXvcw-pPE3-z4Cp-pGaW-tSLY-MEmP-zGYDFz LV Write Access read/write LV Creation host, time debian, 2016-08-25 14:23:05 -0700 LV Status NOT available LV Size 14.55 TiB Current LE 3815317 Segments 1 Allocation inherit Read ahead sectors auto |
To mount your volume groups:
vgscan Reading all physical volumes. This may take a while... Found volume group "raidvol1" using metadata type lvm2 vgchange -ay raidvol1 1 logical volume(s) in volume group "raidvol1" now active |
Now you can mount them like:
mount /dev/raidvol1/raidvol1lv /wherever/you/want/tomount/it/ cd /wherever/you/just/mounted/it/ |
Now if it went well, you should have your raid up and working 🙂
: : :
There are some good RAID resources here.
General recovery stuff can be found here
RedHat (as usual) has some great stuff on it here
If you have to recover an LVM, there’s a good reference here, you can do the same thing on Debian using the Debian LiveCD. Here’s an adaptation of what it says to do:
- Get a live cd or USB, then boot to it rather than your host system you’re fixing.
- Search for these tools: lvm2. If it’s not there, install it like:
apt-get install lvm2 - Use fdisk to figure out which drive(s) you’ll be recovering on. Note: this is not the disk you’re booting from, so MAKE SURE you’re about to work with the right disk.
fdisk -lu - Once installed, run pvscan to scan all disks for physical volume. this to make sure your LVM harddisk is recognized by Debian.
pvscan
PV /dev/sda2 VG VolGroup00 lvm2 [74.41 GB / 32.00 MB free]
Total: 1 [74.41 GB] / in use: 1 [74.41 GB] / in no VG: 0 [0 ]
- fter that run vgscan to scan disks for volume groups.
# vgscan
Reading all physical volumes. This may take a while...
Found volume group "VolGroup00" using metadata type lvm2
- Activate all volume groups available.
vgchange -a y
2 logical volume(s) in volume group "VolGroup00" now active
- Run lvscan to scan all disks for logical volume. You can see partitions inside the hard disk now active.
# lvscan
ACTIVE '/dev/VolGroup00/LogVol00' [72.44 GB] inherit
ACTIVE '/dev/VolGroup00/LogVol01' [1.94 GB] inherit
- Mount the partition to any directory you want, usually to /mnt
# mount /dev/VolGroup00/LogVol00 /mnt
- You can access the partition in the /mnt directory and can backup your data using rsync
====
sfdisk -d /dev/sda | sfdisk /dev/sdh
sfdisk: Checking that no-one is using this disk right now …
sfdisk: OK
Disk /dev/sdh: 182397 cylinders, 255 heads, 63 sectors/track
Old situation:
Units: cylinders of 8225280 bytes, blocks of 1024 bytes, counting from 0
Device Boot Start End #cyls #blocks Id System
/dev/sdh1 0+ 182401- 182402- 1465136128 7 HPFS/NTFS/exFAT
/dev/sdh2 0 – 0 0 0 Empty
/dev/sdh3 0 – 0 0 0 Empty
/dev/sdh4 0 – 0 0 0 Empty
New situation:
Units: sectors of 512 bytes, counting from 0
Device Boot Start End #sectors Id System
/dev/sdh1 * 2048 58593279 58591232 83 Linux
/dev/sdh2 58593280 64452607 5859328 fd Linux raid autodetect
/dev/sdh3 64452608 2930210815 2865758208 fd Linux raid autodetect
/dev/sdh4 0 – 0 0 Empty
sfdisk: Warning: partition 1 does not end at a cylinder boundary
sfdisk: Warning: partition 2 does not start at a cylinder boundary
sfdisk: Warning: partition 2 does not end at a cylinder boundary
sfdisk: Warning: partition 3 does not start at a cylinder boundary
sfdisk: Warning: partition 3 does not end at a cylinder boundary
Successfully wrote the new partition table
Re-reading the partition table …
sfdisk: If you created or changed a DOS partition, /dev/foo7, say, then use dd(1)
to zero the first 512 bytes: dd if=/dev/zero of=/dev/foo7 bs=512 count=1
(See fdisk(8).)
mdadm –manage /dev/md0 –add /dev/sdh3
mdadm: added /dev/sdh3
Rebuilding a partially failed RAID:
mdadm --examine /dev/sd[bcd]1 >> raid.status mdadm --stop /dev/md0 mdadm --create /dev/md0 --level=6 --raid-devices=4 --chunk=64 --name=backup1:0 /dev/sda1 /dev/sdb1 /dev/sdc1 /dev/sdd1 --assume-clean mdadm: /dev/sda1 appears to be part of a raid array: level=raid6 devices=4 ctime=Tue Jul 19 17:34:55 2016 mdadm: /dev/sdb1 appears to be part of a raid array: level=raid6 devices=4 ctime=Tue Jul 19 17:34:55 2016 mdadm: /dev/sdc1 appears to be part of a raid array: level=raid6 devices=4 ctime=Tue Jul 19 17:34:55 2016 Continue creating array? y mdadm: Defaulting to version 1.2 metadata mdadm: array /dev/md0 started. root@debian:/home/user >: cat /proc/mdstat Personalities : [raid6] [raid5] [raid4] md0 : active raid6 sdd1[3] sdc1[2] sdb1[1] sda1[0] 7812233216 blocks super 1.2 level 6, 64k chunk, algorithm 2 [4/4] [UUUU] bitmap: 30/30 pages [120KB], 65536KB chunk unused devices: <none> |
So it looks like it worked!
adding another drive to a raid6
In this case, I want to add a new drive to expand the capacity of an existing raid6 that HAD 4 drives, but I want add one, so I will have 5, and more capacity. So this is what I’m starting with:
cat /proc/mdstat Personalities : [raid6] [raid5] [raid4] [linear] [multipath] [raid0] [raid1] [raid10] md127 : active raid6 sdd1[0] sdf1[2] sdh1[3] sde1[1] 5850767360 blocks super 1.2 level 6, 512k chunk, algorithm 2 [4/4] [UUUU] bitmap: 2/22 pages [8KB], 65536KB chunk |
Now I inserted a new drive, which the OS called /dev/sdg, which I formatted like:
parted /dev/sdg GNU Parted 3.2 Using /dev/sdg Welcome to GNU Parted! Type 'help' to view a list of commands. (parted) p Error: Both the primary and backup GPT tables are corrupt. Try making a fresh table, and using Parted rescue feature to recover partitions. Model: ST3000DM001-1CH1 (scsi) Disk /dev/sdg: 2996GB Sector size (logical/physical): 512B/512B Partition Table: unknown Disk Flags: (parted) mklabel gpt (parted) p Model: ST3000DM001-1CH1 (scsi) Disk /dev/sdg: 2996GB Sector size (logical/physical): 512B/512B Partition Table: gpt Disk Flags: Number Start End Size File system Name Flags (parted) unit TB (parted) p Model: ST3000DM001-1CH1 (scsi) Disk /dev/sdg: 3.00TB Sector size (logical/physical): 512B/512B Partition Table: gpt Disk Flags: Number Start End Size File system Name Flags (parted) mkpart primary 0.00TB 3.00TB (parted) p Model: ST3000DM001-1CH1 (scsi) Disk /dev/sdg: 3.00TB Sector size (logical/physical): 512B/512B Partition Table: gpt Disk Flags: Number Start End Size File system Name Flags 1 0.00TB 3.00TB 3.00TB primary (parted) set 1 raid on (parted) quit Information: You may need to update /etc/fstab. |
Now I have to add it to the raid6 md127 like:
mdadm --add /dev/md127 /dev/sdg1 mdadm: added /dev/sdg1 mdadm --grow --raid-devices=5 /dev/md127 cat /proc/mdstat Personalities : [raid6] [raid5] [raid4] [linear] [multipath] [raid0] [raid1] [raid10] md127 : active raid6 sdg1[4] sdd1[0] sdf1[2] sdh1[3] sde1[1] 5850767360 blocks super 1.2 level 6, 512k chunk, algorithm 2 [5/5] [UUUUU] [>....................] reshape = 0.0% (104448/2925383680) finish=1866.8min speed=26112K/sec bitmap: 2/22 pages [8KB], 65536KB chunk |
It will be re-syncing the data for a really long time behind the scenes now. In this example it took around 12 hours! When it’s done, it should look something like:
cat /proc/mdstat Personalities : [raid6] [raid5] [raid4] [linear] [multipath] [raid0] [raid1] [raid10] md127 : active raid6 sdg1[4] sdd1[0] sdf1[2] sdh1[3] sde1[1] 8776151040 blocks super 1.2 level 6, 512k chunk, algorithm 2 [5/5] [UUUUU] bitmap: 2/22 pages [8KB], 65536KB chunk |
Notice how the size is much larger
You may have to re-add the new expanded raid to mdadm.conf like:
mdadm --detail --scan >> /etc/mdadm/mdadm.conf |
Just make sure you delete the old entry.
Although you added the new drive, it has to finish reshaping the raid array before the new space will show up, so you HAVE TO WAIT before doing the next stuff.
Now I have to expand the physical volume, volume group, lvm and then the ext4 that sits on top of the md127 raid6 to use this new space. First, unmount your raid:
umount /dev/mapper/raidvol1-raidvol1lv |
now use pvresize to resize the physical volume to the new raid size. Here is the starting point
pvdisplay --- Physical volume --- PV Name /dev/md127 VG Name raidvol1 PV Size 5.45 TiB / not usable 4.00 MiB Allocatable yes (but full) PE Size 4.00 MiB Total PE 1428409 Free PE 0 Allocated PE 1428409 PV UUID L11RdW-3Yw5-fDNL-6TzJ-wSNb-eZ4g-HV6DM5 |
Now I resize and measure the size again.
pvresize /dev/md127 Physical volume "/dev/md127" changed 1 physical volume(s) resized / 0 physical volume(s) not resized pvdisplay --- Physical volume --- PV Name /dev/md127 VG Name raidvol1 PV Size 8.17 TiB / not usable 3.00 MiB Allocatable yes PE Size 4.00 MiB Total PE 2142614 Free PE 714205 Allocated PE 1428409 PV UUID L11RdW-3Yw5-fDNL-6TzJ-wSNb-eZ4g-HV6DM5 |
Now you have to extend the LVM. Note the volume group (VG) was automatically expanded in the process of the pvresize. So now you do:
lvextend -l +100%FREE /dev/raidvol1/raidvol1lv Size of logical volume raidvol1/raidvol1lv changed from 5.45 TiB (1428409 extents) to 8.17 TiB (2142614 extents). Logical volume raidvol1/raidvol1lv successfully resized |
and now you have to resize the partition on top of it, but first you should file system check it:
e2fsck -f /dev/raidvol1/raidvol1lv e2fsck 1.43.4 (31-Jan-2017) Pass 1: Checking inodes, blocks, and sizes Inode 15466499 extent tree (at level 2) could be narrower. Fix<y>? yes Pass 1E: Optimizing extent trees Pass 2: Checking directory structure Pass 3: Checking directory connectivity Pass 4: Checking reference counts Pass 5: Checking group summary information /dev/raidvol1/raidvol1lv: ***** FILE SYSTEM WAS MODIFIED ***** /dev/raidvol1/raidvol1lv: 14/182837248 files (0.0% non-contiguous), 13747352/1462690816 blocks resize2fs /dev/raidvol1/raidvol1lv resize2fs 1.43.4 (31-Jan-2017) Resizing the filesystem on /dev/raidvol1/raidvol1lv to 2194036736 (4k) blocks. The filesystem on /dev/raidvol1/raidvol1lv is now 2194036736 (4k) blocks long. |
Now mount it again and see if it worked!
mount /dev/raidvol1/raidvol1lv /raid6localvol/ df -h Filesystem Size Used Avail Use% Mounted on /dev/mapper/raidvol1-raidvol1lv 8.2T 7.5G 7.7T 1% /raid6localvol |