openvpn howto
OpenVPN will allow your connection to be encrypted when you talk to a network, but the documentation is awful unless you happen to run networks everyday. Here is a howto that will explain how to set up an OpenVPN server that you can login to, access things on that local network, and when you surf the Internet, you will “appear” to come from your OpenVPN server’s location.
This cut/paste how to is done with Debian Squeeze/Wheezy, though it could be modified and will work on a number of Linux/BSD distro’s, so choose what works for you. It’s not really exhaustive or ultra-secure, but it has decent security, works well and is very solid and requires little maintenance. For the next step up in security, you might try a IPSEC VPN, they’re better, but this isn’t too shabby, and it’ll run on very low powered hardware that costs very little.
OpenVPN setup
Since Buster is so different, this first section is for BUSTER ONLY, so if you have something else, skip down to that section:On your BUSTER SERVER do:
apt install openvpn easy-rsa cd /etc/openvpn make-cadir easy-rsa/ cd easy-rsa vi vars change this stuff to what you actually have: #set_var EASYRSA_REQ_COUNTRY "US" #set_var EASYRSA_REQ_PROVINCE "California" #set_var EASYRSA_REQ_CITY "San Francisco" #set_var EASYRSA_REQ_ORG "Copyleft Certificate Co" #set_var EASYRSA_REQ_EMAIL "me@example.net" #set_var EASYRSA_REQ_OU "My Organizational Unit" #set_var EASYRSA_KEY_SIZE 4096 |
On your SERVER do:
apt-get install openvpn (in Wheezy) cp -R /usr/share/doc/openvpn/examples/easy-rsa/2.0/* /etc/openvpn/ (in Jessie) cp -R /usr/share/easy-rsa/* /etc/openvpn/ cd /etc/openvpn vi vars export KEY_COUNTRY="US" export KEY_PROVINCE="ST" export KEY_CITY="YourTown" export KEY_ORG="OpenVPN" export KEY_EMAIL="youremail@whatever.com" . vars ./clean-all ./build-ca openvpn --genkey --secret /etc/openvpn/ta.key ./build-key-server server ./build-key yourclient1 <-- change defaults if you want then say yes to next lines Sign the certificate? [y/n]:y 1 out of 1 certificate requests certified, commit? [y/n]y ./build-dh cd /etc/openvpn/keys/ (in Wheezy) cp ca.crt ca.key dh1024.pem server.crt server.key /etc/openvpn (in Jessie) cp ca.crt ca.key dh2048.pem server.crt server.key /etc/openvpn cd /usr/share/doc/openvpn/examples/sample-config-files/ gunzip server.conf.gz cp server.conf /etc/openvpn/openvpn.conf vi /etc/openvpn/openvpn.conf (uncomment these, change to suit taste) port 1194 proto udp dev tun ca ca.crt cert server.crt key server.key (in Wheezy) dh dh1024.pem (in Jessie) dh dh2048.pem server 10.8.0.0 255.255.255.0 ifconfig-pool-persist ipp.txt push "redirect-gateway def1 bypass-dhcp" push "dhcp-option DNS 208.67.222.222" client-to-client duplicate-cn keepalive 10 120 comp-lzo user nobody group nogroup persist-key persist-tun status openvpn-status.log log-append /var/log/openvpn.log mute 20 sndbuf 0 rcvbuf 0 push "sndbuf 393216" push "rcvbuf 393216" touch /var/log/openvpn.log /etc/init.d/openvpn start echo 1 > /proc/sys/net/ipv4/ip_forward vi /etc/sysctl.conf net.ipv4.ip_forward=1 (uncomment) iptables -t nat -A POSTROUTING -s 10.8.0.0/24 -o eth0 -j MASQUERADE iptables -A FORWARD -i tun0 -s 10.8.0.0/24 -o eth0 -j ACCEPT iptables-save > /etc/iptables.up.rules vi /etc/network/if-up.d/iptables #!/bin/sh iptables-restore < /etc/iptables.up.rules chmod +x /etc/network/if-up.d/iptables cp /usr/share/doc/openvpn/examples/sample-config-files/client.conf /etc/openvpn/ vi /etc/openvpn/client.conf remote my-server-1 1194 (change my-server-1 to ip of your openvpn server) cert client.crt (change client.crt to whateveryourcertnameis.crt) key client.key (change client.key to whateveryourkeynameis.key) cd /etc/openvpn/keys/ now copy (via scp or whatever) your ca.crt, whateverclientname.crt, whateverclientkeyname.key and ../client.conf to your remote laptop reboot ping 10.8.0.1 |
Here are a couple performance tweaks you try for higher VPN throughput. You don’t have to do these, and it will probably work fine. But if you want to attempt it, go to the SERVER and add these lines like:
vi /etc/openvpn/openvpn.conf sndbuf 0 rcvbuf 0 push "sndbuf 393216" push "rcvbuf 393216" /etc/init.d/openvpn restart |
#!/bin/bash
openvpn –cd /etc/openvpn –config /etc/openvpn/openvpn.conf
now you have to configure your client on your laptop. To do this, you have to download the openvpn client from their website (or use tunnelblick for mac). Just copy those files listed above to your laptop, then use them to connect the client using that configuration. You can import client.conf into the client, and *usually* it will work.
Windows 7 OpenVPN client howto
1. You can download the latest version of OpenVPN client 64-bit 2.3.11 version click here
2. Install it using the default install options. When you install, it will prompt you to install a TAP driver, like this: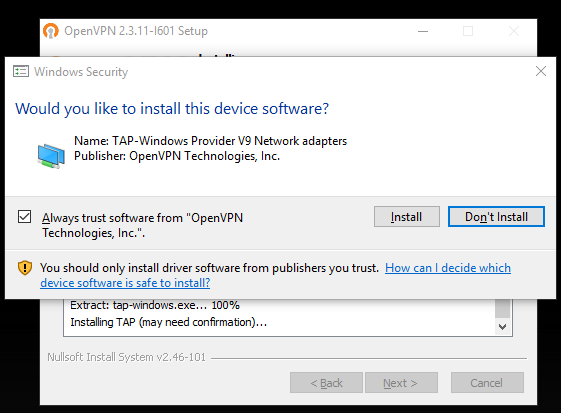
You have to install this driver or it won’t work.
3. move your 4 files into: C:\Program Files\OpenVPN\config\ and rename client.conf to client.ovpn
4. You’ll have to run it as Administrator, which means you’ll need permission to run things as Administrator, not just a normal user, otherwise the routing will screw up. After you install OpenVPN, it will put an icon on your desktop by default. Right-click that icon and select Properties -> Advanced properties and enable the “Run as Administrator” checkbox like this: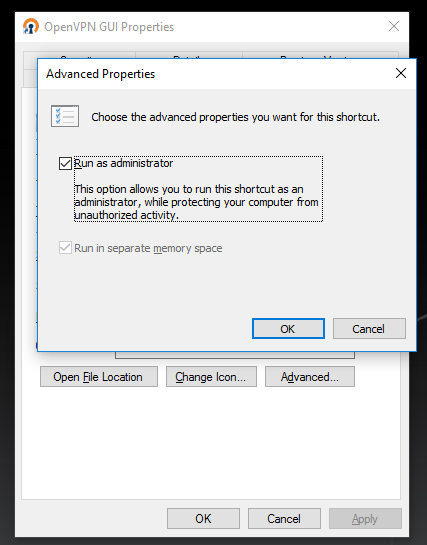
5. Click on the gui icon. When that starts, it will put a tiny icon in your systray.
6. Right-click on that, then select “connect”. You should see a text window open and show the connection details (many lines scrolling past), but eventually if it’s successful, that window will close itself, and then you’ll see a tiny pop-up window saying that you now have an IP like 10.x.x.x, which means you are connected to the VPN.
7. Now if you visit www.whatismyip.com, you should see the public IP of your VPN, not the local connection you are using. This means you now “appear” to be coming from that IP, and are routing all your web/email/IM traffic through your VPN over an encrypted tunnel.
Windows 8 client setup
Windows 8 works the same as Windows 7, but you MIGHT have to do an extra step. Before you do that, try to download and install the latest version 64bit here or 32bit here. If it doesn’t work, try these next steps.
1. Run services.msc from the command window, or navigate to the Windows search feature and type: services.msc
2. Once that runs, right-click on the “Network Connections” line and select “Properties”, which will open a new dialog box
3. On the Properties box under the “General” tab (which should just come up), change the “Startup Type:” to automatic, is probably was manual before.
4. Further down the dialog box it should say “Service Status:” which is probably “Stopped”. Hit the “Start” button, which will enable the stuff you need to continue connecting to your OpenVPN server.
5. Hit “Apply” and then “OK”, then close out of your “Services” dialog box.
6. Now continue with Step 5 on the Windows 7 client section above this one.
Windows 10 client setup
1. It should be the same as Windows7/Windows8.
Mac client setup
1. Download a client, I used tunnelblick, but there are others. Here we will walk through the setup for Tunnelblick.
2. copy your 4 configuration files to your Mac
3. Run Tunnelblick
4. Import your client.conf file through the Tunnelblick utility
5. Open up a browser and navigate to whatismyip, you should see the IP of your VPN server, this means it working, and your connection is now encrypted, so you will now “appear” to be coming from your VPN’s IP address, not the IP address of your Mac.
Linux
This is for Mint/Ubuntu/Debian
apt-get install openvpn cd /etc/openvpn rsync -hauv -e ssh yourusername@ip.of.remote.server:path/to/where/your/cert_files_are/* ./ /etc/init.d/openvpn restart |
make sure your client.conf has the following lines configured right:
remote your.server.i.p 1194
ca ca.crt
cert nameofuser.crt
key nameofuser.key |
Write a comment
You need to login to post comments!